In my previous blog post, I showed you how to automate releases using pull request titles for your NuGet packages.
When you use this process less often, or if you have new people onboarding your team, it is beneficial to give some additional help/ insights when they go through the process. This blog post will look at how to build an Azure Function to provide more information about the process during your regular pull request workflow.
What will we build
To extend your Azure DevOps Pull Request workflow, you can build a customized workflow by creating an HTTP endpoint. This endpoint will be notified whenever a pull request is created or updated through service hooks, allowing us to call the Azure DevOps API to update the state.
Let’s start with creating the PAT token required to access the Azure DevOps API.
Creating the PAT (Personal Access Token) token
A personal access token contains your security credentials for Azure DevOps. A PAT identifies you, your accessible organizations, and scopes of access. As such, they’re as critical as passwords, so you should treat them the same way. That’s why we will store this token in Azure KeyVault later on.
Let’s create the token with the required scope. Go to your Azure DevOps environment and click the user settings icon next to your profile image in the top right of the window. Pick the option Personal Access Token.

This will open up the User settings page on the section Security with Personal access tokens selected. By default, the PAT tokens screen will show you active tokens and allow you to create a new token. Click the + New Token button to generate the required token.

A new window opens up to generate a personal access token. Set the title to something you will remember; in our case, we will use semantic-release title validation.
Select the expiration date for the token. This is the period the token will be active; after this date, the token will stop working, and you will need to extend or re-create it.
Next, we will specify the scopes that can be accessed using the token. Select Custom defined to specify a subset of scopes. In the Section Code check the item Status. This will give the token access to read and write commit and pull request statuses.

Click the Create button on the bottom of the screen to create the token. A new token will be generated; copy this token, because it won’t be shown again. Keep this safe for now, we will later on store this in Azure KeyVault (part 2 of this article).

With out token created, we can move on to the next step; let’s create our Azure Function to perform the title validation.
Creating the Azure Function
Open Visual Studio and create an Azure Function; in the project creation wizard, select .NET 7.0 Isolated as the Function worker option. This will generate a project for us with a default Function1 class - rename this class to SemanticReleaseConventionFunctions.
Ingestion of the PAT token secret
To send back status information to Azure DevOps API we need to use the PAT token from our code. To supply this token, we will create a record called ApplicationSettings and add one property to called PatToken to the record.
public record ApplicationSettings
{
    public string? PatToken { get; set; }
}
Next, we set up the startup logic to load the settings from local.settings.json file and de-serialize them into the ApplicationSettings object.
Open up the Program.cs file and add the ConfigureServices method and the code to setup the application settings configuration (line 8 till 14 below).
using AzureDevopsSemanticRelease;
using Microsoft.Extensions.Configuration;
using Microsoft.Extensions.DependencyInjection;
using Microsoft.Extensions.Hosting;

var host = new HostBuilder()
    .ConfigureFunctionsWorkerDefaults()
    .ConfigureServices(s =>
    {
        s.AddOptions<ApplicationSettings>().Configure<IConfiguration>((settings, configuration) =>
        {
            configuration.GetSection(nameof(ApplicationSettings)).Bind(settings);
        });
    })
    .Build();

host.Run();
Add the setting for the PAT token temporarily to your local.settings.json and paste the token you’ve generated above.
Your local.settings.json file should not be checked into source control, because it contains a secret. We will temporarily keep the token in this file to simplify debugging our code, remove it again when you validated everything works.
{
  "IsEncrypted": false,
  "Values": {
    "AzureWebJobsStorage": "UseDevelopmentStorage=true",
    "FUNCTIONS_WORKER_RUNTIME": "dotnet-isolated",
    "ApplicationSettings:PatToken": "REPLACE_WITH_YOUR_PAT_TOKEN"
  }
}
We can now retrieve the application settings in our Function class by using dependency injection to inject it into our constructor (line 5 to 8).
Create a constructor for your class and add the parameter IOptions<ApplicationSettings> settings and store it’s value in a private field (line 3).
public class SemanticReleaseConventionFunctions
{
    private readonly string pat;

    public SemanticReleaseConventionFunctions(IOptions<ApplicationSettings> settings)
    {
        pat = settings.Value.PatToken ?? throw new ConfigurationException("Unable to find setting 'ApplicationSettings:PatToken'");
    }
}

public class ConfigurationException : Exception
{
    public ConfigurationException(string message) : base(message) { }
}
Create the HTTP trigger
We’re now ready to add the HTTP endpoint and the logic to validate the pull request title.
Create an Azure Function for the route validate-pr-title that accepts POST requests in the SemanticReleaseConventionFunctions class.
- On line 5 and 6 we retrieve the body from the request and parse the json to our object structure to understand the message.
- Line 8 takes this object and generates the status message and submits it to the Azure DevOps rest API endpoint.
- On line 10 till 12 we create a valid response for the webhook.
[Function(nameof(ValidatePRTitle))]
public async Task<HttpResponseData> ValidatePRTitle(
    [HttpTrigger(AuthorizationLevel.Function, "post", Route = "validate-pr-title")] HttpRequestData req)
{
    var body = await req.ReadAsStringAsync() ?? throw new MessageProcessingException("Unable to read body");
    var pr = JsonSerializer.Deserialize<Message>(body) ?? throw new MessageProcessingException("Unable to parse body");

    await PostStatusOnPullRequest(GenerateStatusMessage(pr.resource.title, pr.resource.repository.webUrl), pr.resource.url);

    var response = req.CreateResponse(HttpStatusCode.OK);
    response.Headers.Add("Content-Type", "text/plain; charset=utf-8");
    return response;
}

public class MessageProcessingException : Exception
{
    public MessageProcessingException(string message) : base(message) { }
}
In addition, we need a few objects to store the data structure in which Azure Devops sends the event.
public record Message
{
    public PullRequestResource resource { get; set; } = new();
}

public record PullRequestResource
{
    public string title { get; set; }

    public int pullRequestId { get; set; }

    public string url { get; set; }

    public PullRequestRepository repository { get; set; } = new();

}

public record PullRequestRepository
{
    public string webUrl { get; set; }
}
Create the GenerateStatusMessage method
In the generate status method, we will generate the message to post to Azure DevOps based on the title text. We return a succeeded state by default, and if it’s not in the right format the pending state. In both cases, we return the generated description, either providing the error description or the type of release it will create.
private static string GenerateStatusMessage(string pullRequestTitle, string repositoryUri)
{
    string state = "succeeded";
    var (valid, description) = ParseTitle(pullRequestTitle);
    if (!valid)
    {
        state = "pending";
        description = "PR title is not following PR title conventions (<type>(<scope>): or <type>:); click me for more information.";
    }

    return JsonSerializer.Serialize(
        new
        {
            State = state,
            Description = description,
            TargetUrl = $"{repositoryUri}?path=/docs/release-instructions.md&version=GBmain&_a=preview",

            Context = new
            {
                Name = "PullRequest-SemanticRelease-Commit-Title",
                Genre = "pr-azure-function-ci"
            }
        });
}
In the ParseTitle method we parse the title and process it to define the type of release. On line 13 to 24 you can define your rules around releases.
private static (bool, string) ParseTitle(string title)
{
    Match m = SemanticReleaseRegex().Match(title);

    string message = "No release will be created.";

    if (m.Success)
    {
        var tag = m.Groups["tag"].Value;
        var scope = m.Groups["scope"].Value;

        string? releaseType = null;
        switch (tag)
        {
            case "feat":
                releaseType = "minor";
                break;
            case "docs" when scope == "README":
            case "perf":
            case "fix":
            case "deps":
                releaseType = "patch";
                break;
        }

        message = string.IsNullOrEmpty(releaseType) ?
              $"PR title is according to PR title conventions for semantic release and will _not_ perform a release."
            : $"PR title is according to PR title conventions for semantic release and will perform a {releaseType} release";
    }

    return (m.Success, message);
}

[GeneratedRegex("^(?<tag>docs|perf|fix|deps|feat|style|test|refactor)\\(?(?<scope>.*?)\\)?:(?<description>.*)", RegexOptions.IgnoreCase)]
private static partial Regex SemanticReleaseRegex();
We defined the following rules below: If the tag is feat we will expect a minor release. When the tag is docs and the scope is README we will expect a patch release and when it is in any other scope but uses the tag docs no release will be created. The tags perf, fix, and deps will expect a patch release. All the other tags or scopes will not expect a release.
Line 26 to 28 will generate the correct description based upon the release type.
Line 34 and 35 contain a regular expression parsing the title text. The GeneratedRegex was introduced in .NET 7 that uses Roslyn enabled source generators to provide the regex implementation; for more information see .NET regular expression source generators.
The regex will roughly perform the following:
We expect the title string to start with a tag:
- docs
- perf
- fix
- deps
- feat
- style
- test
- refactor
Then optionally, we would detect a scope and the rest as the description (in our sample, we don’t use the description).
Next, we look at the last bit, sending the generated response to Azure DevOps in the PostStatusOnPullRequest method.
We use the PAT token previously retrieved from the settings, convert it to a base64 string, and add it as basic authorization header (line 5). Finally, we send the message generated in the GenerateStatusMessage method to the Azure DevOps REST API and validate the response (The EnsureSuccessStatusCode method throws an Exception if the status code is not a successful one).
private async Task PostStatusOnPullRequest(string message, string prUri)
{
    using HttpClient client = new();
    client.DefaultRequestHeaders.Accept.Add(new MediaTypeWithQualityHeaderValue("application/json"));
    client.DefaultRequestHeaders.Authorization = new AuthenticationHeaderValue("Basic", Convert.ToBase64String(Encoding.ASCII.GetBytes($":{pat}")));

    var request = new HttpRequestMessage(new HttpMethod("POST"), $"{prUri}/statuses?api-version=4.1")
    {
        Content = new StringContent(message, Encoding.UTF8, "application/json")
    };

    using HttpResponseMessage response = await client.SendAsync(request);
    response.EnsureSuccessStatusCode();
}
Testing/ running your code locally using the public preview of dev tunnels
It’s always more fun and easier to understand first to see your code working on your machine and be able to debug it and step through your code. This is a bit difficult for most because our development machine is most likely not directly exposed to the internet/ publicly accessible. To still perform this action, we need a temporary tunnel.
This can either be done using ngrok or a new tool in Visual Studio called dev tunnels. We will use the latter. For this to work, you must ensure you have version 17.4 of Visual Studio (or newer).
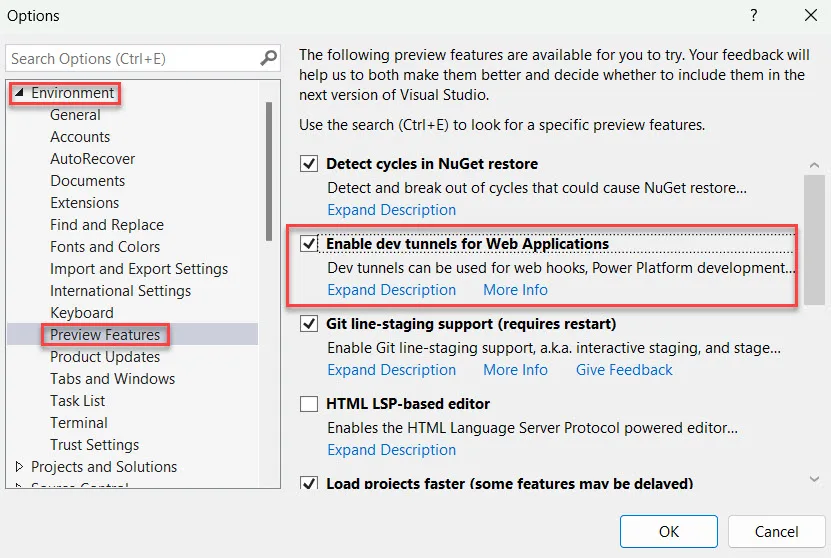
The first step is to enable the preview version; go to: Tools, Options in the Visual Studio toolbar. The options window will show; on the left side, open up the Environment section and select the subsection Preview Features.
Ensure the checkbox before ‘Enable dev tunnels for Web Applications’ is checked.
Next, we need to configure the Azure Function to use dev tunnels.
In your solution explorer, open the folder Properties and open the file launchSettings.json.
See the code below, and make sure the launchBrowser option is set to true; by default, this is set to false and add the two devTunnel properties on like 7 and 8.
{
  "profiles": {
    "AzureDevopsSemanticRelease": {
      "commandName": "Project",
      "commandLineArgs": "--port 7068",
      "launchBrowser": true,
      "devTunnelEnabled": true,
      "devTunnelAccess": "public"
    }
  }
}
Start your Azure Function app by clicking play or F5 to run it. A new browser window will open, which contains the link to your dev tunnel. In the screenshot, the actual URL is masked with *'s; yours will have a random set of characters and is personal to you/ made at random for this moment.
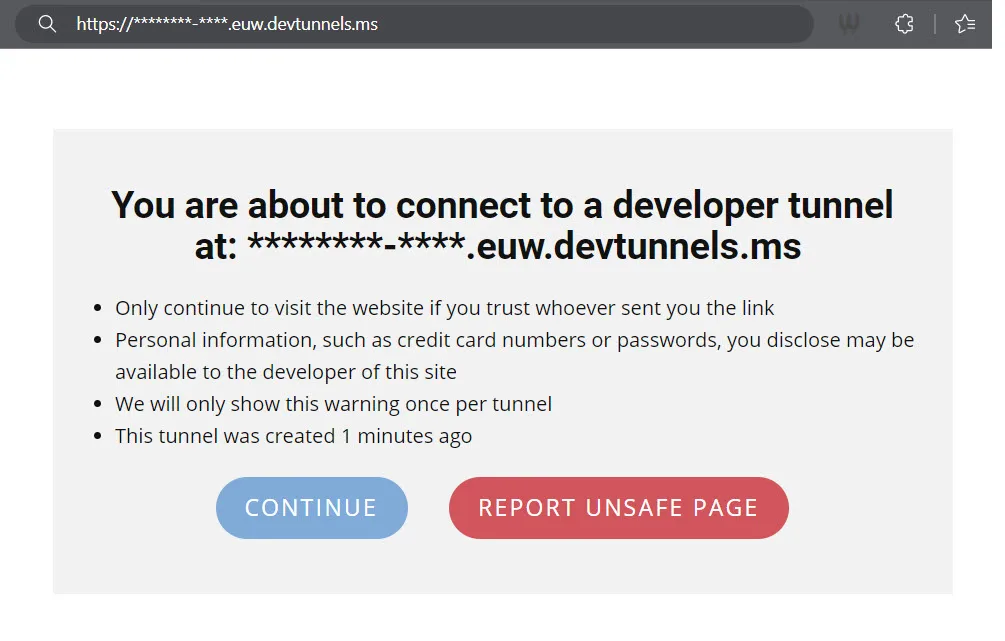
Copy the URL you get, because we will use it in the next step to setup the webhook. We now have our Azure Function set up to perform the validation, let’s test it.
Setting up the webhook in Azure DevOps
We need to set up a service hook to be made aware of new pull requests or changes to a pull request. A service hook is comparable to a webhook; when something occurs, it calls your HTTP endpoint to inform you of the change.

Next, go to the section Service hooks and click the + Create subscription button.

If you already have service hooks configured, the screen looks a bit different, clicking the + button will bring you to the same spot.

A new window will open up, scroll down in the list on the left and select Web Hooks and click Next.

On the next screen, we must set the type of events we would like to receive. In the dropdown below Trigger on this type of event select Pull request created and click Next.
Optionally, you can filter on repository, target branch, or members. For example, if you use a lot of different branches, then set this to your main branch (the branch that triggers the release).

The last part of the wizard steps allows you to specify the target URL. For testing purpose and to see the code in action, we will add the URL we received above when creating the dev tunnel appended with /api/validate-pr-title.
Note: once the system is deployed to production, we must replace this URL with the production URL.

Our first service hook/webhook is now configured.
Repeat the process above once more for pull request updates. In the event to trigger step, select Pull request updated for the field Trigger on this type of event. Once this is completed, you will have two service hooks, one that triggers the creation of pull requests and one that triggers changes/updates to pull requests.
We can now create a testing pull request and try to adjust the title when our Function App is running on our local machine. If you set a breakpoint, it will be hit, and you can step through the code.

Be aware that your setup is now configured to work with the local instance running on your machine temporarily. We don’t want to keep this on all the time, so after confirming that everything works, we should remove the webhook from Azure DevOps so we can, once you complete the deployment/push it to production later on, reconfigure it.
Finally
With the above step completed, we’ve seen that the code does what we expect it to do and also discovered how to debug and step through the code if we ever require that. Running the function locally on your machine isn’t a sustainable option.
In the second part of the blog post, we will look at how we can bring our code to production/ host it in Azure.
Up next
In part 2 of this blog post, we will cover how to create our IaC (Infrastructure as Code) a bicep template to deploy our infrastructure, setup our Azure build pipeline to release/deploy everything, and finally hook it all up to our production environment, so that it is ready for use.